Problem & Solution
Our goal is to design a robot that will help people who are injured or with disability reach for things easily. It also has to be easy to operate. We looked through the NXT robot ideas and decided to build the robot arm. The robot is the right solution to our problem with its abilities
to rotate, shift up and down, and it has a claw that grab things. It's easy to operate with a few steps by using NXT buttons and a touch sensor. The function of NXT buttons are clearly marked by on the display.
The Design
The robot has three function: rotate, shift, and grab. The NXT buttons are use to operate rotation and shifting function. The touch sensor is use to operate the claw. When the program starts, it will first navigate to the rotation function. The user can choose to rotate almost 360° left or right by holding the button down until he finds the right angle. The square is use to switch between rotation function and shifting function. The shifting function also uses the same operating principle. Once the touch sensor is pushed the claw will close and the user can push the touch sensor again to release the claw.
::..::..::..::..::...:.:..:.Exploring Robochuu::..::..::..::..::...:.:..:.
Pictures of our creation
We just finished building our Robochuu. In this picture, Robochuu looks like it's consuming the guy in the back. haha.
Zakk being hugged by Robochuu.
View of Robochuu from above.
When testing, our group discussed that it was a little loose at the base, so Athena added some extra pieces to the sides of the base motor to make it more stable when the motors moved.
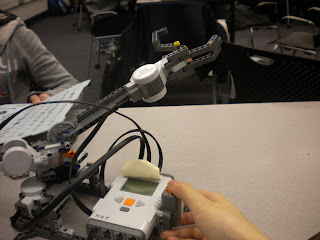
The original instruction had claw pieces that weren't included in our set. We created our own version of the claw out of the angeled pieces provided. The bottom claws are movable by the motor and the top claws don't move. We added pieces to make the top claws more stable so that it clamps.
This is our Robochuu holding a tire.
This is a display of side to side (left to right) movement. The left arrow moves left and the right arrow moves right.
This is a display of the up and down movement. The left arrow moves up and the right arrow moves down. Press the orange square button to switch from up/down or side/side movements.
The claw is holding a tire. We press the sensor button to grab and release the object.
The claw releases the tire and it drops. (It rolled and fell on the floor.)
Videos of our Robochuu in action
Robochuu Arm: Demo attempt 1
Robochuu Arm: Demo attempt 1
Our group's first attempt. Fail. It was funny though.
Robochuu Arm: Demo attempt 2
Our second attempt. Success. Athena couldn't help but laugh... and it looks like the claw is on her mouth. Zakk does sound effects toward the end. We did it!
Robochuu Arm: Demo attempt 3
Just for fun, testing out the controls.
The Program Overview
The program is designed to accommodate the ‘Robot Arm’ design. The program includes rotation function, shifting function (up and down), and claw grabbing function. It has been modified from the original program included in the building instruction. The motors power has been restricted, the text on the display has been changed, and the sound effects were added.
Rotation Function
Starting at the beginning, three screen display blocks (“Rotation”, “⇐”, and “⇒”) represent what text or symbol will be shown on the NXT display. According to the switch block, when the left arrow button is pushed and hold the motor that connected to port A will turn left and sound effect will turn on. The same goes for the right arrow button, when it is pushed and hold the motor that connected to port A will turn right and sound effect will turn on. The rotation and the sound will stop when the button is released. The function of left and right arrow buttons are loop together so that the user can easily adjust the right angle without having to restart the program. When the square button is pushed the option will change from the rotation function to the shifting function and vice versa.
Shifting Function
After the squared button is pushed, the program goes into the shifting function. It has the same basic layout as the rotation function. The three of display blocks say “crane”, “⇑”, and “⇓”. The switch block lets the user choose between left and right arrow buttons. The left arrow button is for shifting the crane up. The right button is use for shifting the crane down. To work the crane, the buttons need to be push and hold and the motor that connected to port B will move accordingly. While the crane is being shift the sound effect will play. The functions of left and right arrow buttons are loop together for easy height adjustment. When the user is satisfied with the height, the square button can be push to return to the rotation function because both function looped together.


No comments:
Post a Comment